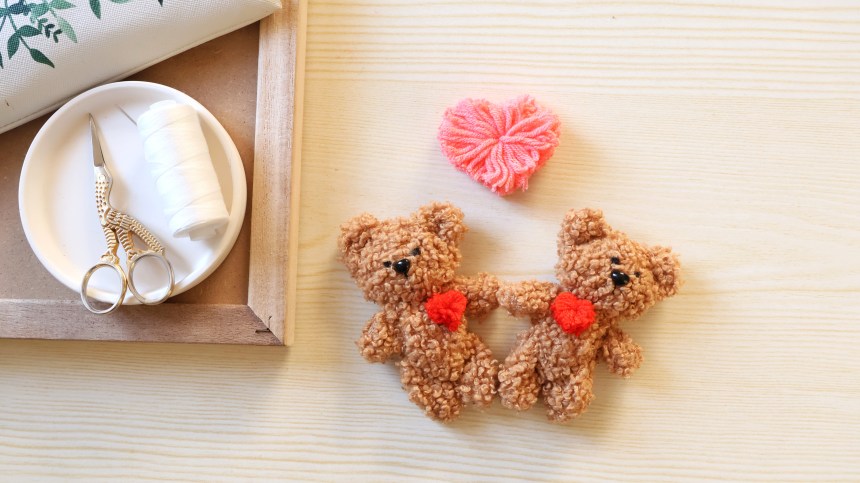
This tiny bear is the sweetest! Bare Heart Bear is showing his/her heart to his/her special someone! This would make a cute couple gift or a present for special occasions. The finished Bare Heart Bear measures 4 IN x 2.5 IN ( H x L ).
MATERIALS
MINI TEDDY BEAR SEWING PATTERN
SEWING NEEDLE
WHITE THREAD
BLACK EMBROIDERY THREAD
5 PLY COTTON BLEND RED YARN
SCISSORS
GLUE STICK
“As an Amazon Associate, I earn from qualifying purchases.”
Time needed: 5 hours
- Download, Print and Cut Out
Download the mini teddy bear sewing pattern and print. Cut out the shapes on the paper and set aside.

- Prepare the Fabric
Cut the fabric into the shapes from your mini teddy bear template. You will be needing two cut out pieces of each body part.

- Sewing the Pieces Together
Start by taking a piece of both sides of the arms, ears and legs and place them together, with the wrong side up. Using your sewing needle and white thread, thread the needle and tie a knot at the end. Using a running stitch with a 0.3 cm seam allowance, sew the pieces together and leave a 1 inch gap.
- Turn the Pieces Right Side Out
Take the pair of arms, ears and legs, and turn the fabric right side out. Use a thin, object to push out every edge and corner of the fabric. Sew the opening closed.
- Putting the Head Together
Join the head fabric together with the wrong side facing up. Place one of the ears in between and align onto the slanted side of the head and sew into place with a 0.3 cm seam allowance. Work your way onto the other side of the head and insert the other ear in between and align onto the slanted side of the head and sew into place. Sew around the head leaving a 1 inch gap unsewn.
Turn the fabric right side out. Fold the head in half, lengthwise and mark the area where the safety nose will be attached. Make a small cut and insert the safety nose onto the center of the head. Secure the nose into place.
Insert a small amount of fiberfill inside the bear head and sew the opening closed.
- Sewing the Body Together
Take the bear tummy fabrics and join together with the wrong side facing up. Insert one of the arms in between and align with the top of the tummy area and sew into place with a 0.3 cm seam allowance. Working your way down to the leg area of the bear, insert one of the legs in between and align onto the slanted area of the tummy of the bear and sew into place.
Insert another one of the legs in between and align onto the slanted area of the tummy of the bear and sew tightly into place. Work your way up and insert another arm in between the tummy and align onto the top of the bear and sew into place.
Insert a small amount of fiberfill into the body of the bear. Sew the opening closed. - Attaching the Head to the Body
Take the head and center onto the body of the bear. Sew into place.

- Sewing on The Details
Using your black thread, sew the eyes onto the bear and add a small vertical stitch just below the center of the nose.

- Create the Mini Pompom Heart
Take your red yarn and hold the tail end of the yarn in between your thumb and middle finger. Wind the yarn around your index finger and your middle finger 15 times and cut. Cut another piece of yarn measuring 4 inches long.
Remove the wound yarn from your fingers and tie the center tightly with the 4 inch yarn. Cut the folded yarn ends into half. Take your scissors and trim the yarn ball into a heart shaped pompom, until it measures around 2 centimeters in height.
- Attaching the Heart to the Bear
Using a glue gun, add a small amount of glue onto the chest area of the bear. Attach the pompom heart onto the bear and hold into place for a few minutes.

The Bare Heart Bear would make a lovely couple gift. You can also download the Bear Match Certificate for your Bare Heart Bear.
Enjoy creating this cute D.I.Y. project for your special loved one!